
⚠ Service Temporarily Unavailable: One of our service providers is experiencing technical difficulties.
This guide is intended for users who need to get started with EnergyDataDK as quick and easy as possible.
In this guide we’ll provide the minimally required instructions to get started with uploading and sharing data. Links will be included to the full documentation for more detailed instructions.
In this guide we assume you already have an active EnergyDataDK user-profile.
Please report any error in this document or suggestions for improvement to: EnergyDataDK@DTU.dk.
Below we will in sequence perform the necessary operations:
First, you’ll need a dataset, which is essentially a collection of datastreams.
To create a new dataset, select the Datasets option from the Settings menu in the upper-right corner of your screen.
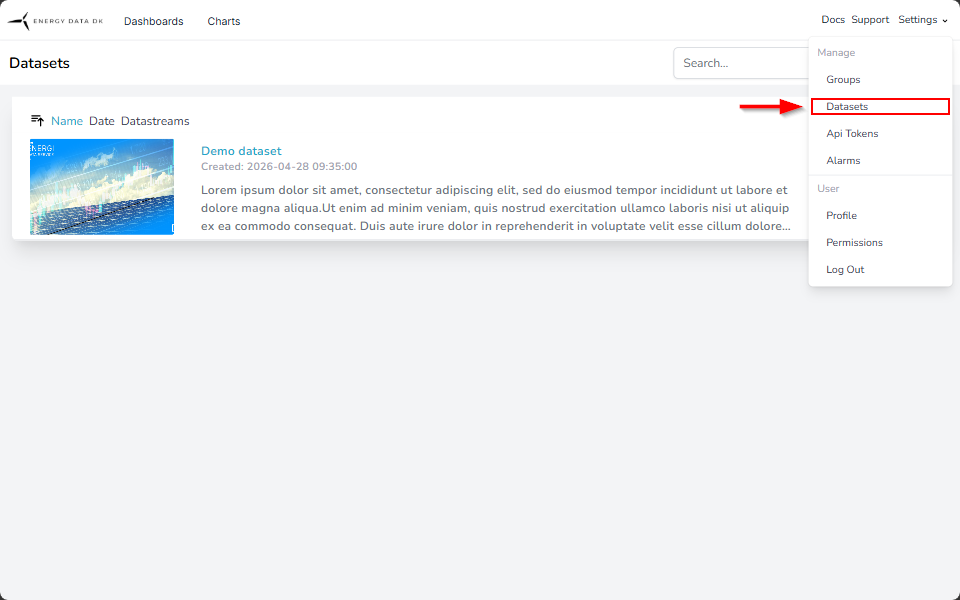
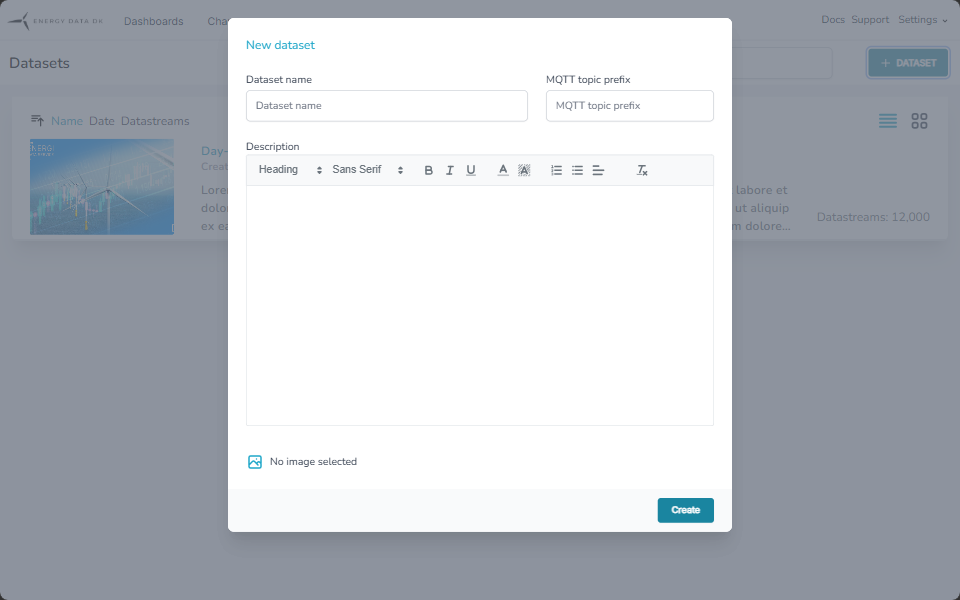
A form should pop up which allows you to provide a name, MQTT topic prefix, description, and an image.
When the relevant information has been added, you may save your new dataset using the Create button.
The name should make it easy to spot what data is contained within, the prefix will function as a unique identifier, and the description should describe the details about the data contained in the dataset. This information should include anything which allows a user to assess whether the data suits their needs.
Detailed information and best practices can be found here.
A dataset can have up to 12,000 datastreams. Particularly if you intend to add a large number of datastreams, it’s advisable to create datastreams using datastream definitions CSV-file.
The file is must be structured as a line with the datastream name, the unit type (“integer”, “double”, or “string”) and a MQTT topic suffix, as well as lines for each of the mandatory meta data properties.
You can use the below template. The template represents a single datastream, you will need to repeat this block for each datastream you intend to add to your dataset.
datastream;<DATASTREAM_NAME>;<UNIT_TYPE>;<MQTT_TOPIC_SUFFIX>
property;Comment;<VALUE>;<DATA_TYPE_ENUM>
property;Data license;<VALUE>;<DATA_TYPE_ENUM>
property;GDPR classification;<VALUE>;<DATA_TYPE_ENUM>
property;Geo tag;<VALUE>;<DATA_TYPE_ENUM>
property;Location;<VALUE>;<DATA_TYPE_ENUM>
property;Organization;<VALUE>;<DATA_TYPE_ENUM>
property;Project tag;<VALUE>;<DATA_TYPE_ENUM>
property;Theme tag;<VALUE>;<DATA_TYPE_ENUM>
property;Unit;<VALUE>;<DATA_TYPE_ENUM>
property;<CUSTOM_PROPERTY>;<VALUE>;<DATA_TYPE_ENUM>
You can find detailed information about what values you should use in our Dataset Description Guide.
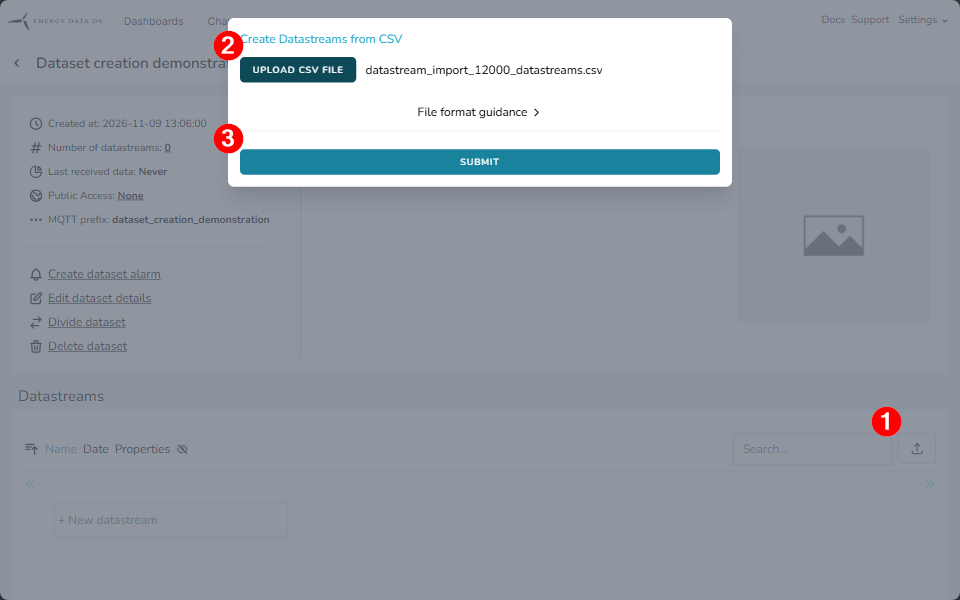
To upload the datastreams definition file, press the button1 in the Datastreams section in the lower half of your screen.
A dialog should be displayed which allows you to select a file on your device using the UPLOAD CSV FILE button2.
Press the SUBMIT button3 to initiate the upload, start the processing of the file, and the subsequent creation of the datastreams.
You can find more detailed instructions here.
Now that you have created the necessary framework, you can start adding sending data into your datastreams.
There are currently two separate methods:
You may use the above links to find detailed information as well as Python scripts which you can use to upload data.
An API token is required to add and/or extract datausing MQTT or Batch API.
To create an API token, select Api Tokens from the Settings menu.
Assign the token a name which reflect what is for, and which rights it grants. Next, choose whether the token is a "Personal" or "Deploy" token. A personal token grants all the rights you have, we therefore recommend using a deploy token, which is more resticted in its use.
When you select "Deploy" you must select which rights to grant, and which datastreams the token has access to.
Finalize the creation of the token by pressing the CREATE button.
The API token is displayed only once, so be sure to save it before closing the dialog.
MQTT is a protocol which is intended for the live streaming of data, you essentially send data to your datastreams in EnergyDataDK as you’re receiving it. It’s not particularly suited for uploading historical data, but it’s great for immediately recording measurements.
With MQTT you’ll essentially be establishing a continuous dataflow.
You can use the below script to transmit data using MQTT.
					import paho.mqtt.client as mqtt
import time
import json

# MQTT Configuration
BROKER = "mqtts.energydata.dk"
PORT = 8883
KEEPALIVE = 45
TOPIC = "<MQTT_TOPIC>"
CLIENT_ID = "<MY_UNIQUE_MQTT_CLIENT_ID>"
TOKEN = "<API_TOKEN>"
VALUE = <VALUE>

# Connection tracking flag
connected = False

# Callback when connected
def on_connect(client, userdata, flags, rc):
    global connected
    if rc == 0:
        print("Connected to broker.")
        connected = True
    else:
        print(f"Connection failed with code {rc}.")

# Callback when disconnected
def on_disconnect(client, userdata, rc):
    global connected
    print("Disconnected.")
    connected = False

# Create client
client = mqtt.Client(client_id=CLIENT_ID)
client.username_pw_set(username=TOKEN)
client.tls_set()

# Attach callbacks
client.on_connect = on_connect
client.on_disconnect = on_disconnect

# Connect to the broker
client.connect(host=BROKER, port=PORT, keepalive=KEEPALIVE)

# Start background loop
client.loop_start()

# Wait for connection
message_printed = False
while not connected:
    if not message_printed:
        print("Waiting for connection...")
        message_printed = True
    time.sleep(.5)

# Send messages
try:
    timestamp = int(time.time() * 1000)
    payload = {
        "timestamp": timestamp,
        "value": VALUE
    }

    # Publish the message
    result = client.publish(topic=TOPIC, qos=0, payload=json.dumps(payload))

    # Check the result
    if result[0] == 0:
        print(f"Message published successfully.")
    else:
        print(f"Failed to publish message, result code: {result[0]}.")

except KeyboardInterrupt:
    print("Stopping publisher...")
except Exception as e:
    print(f"Exception: {e}")
finally:
    client.loop_stop()
    client.disconnect()
The value of <VALUE> must follow a specfic format.
For single a value:
					{
  "timestamp": <unix_timestamp>,
  "value": <value>
}
For multiple values:
					{
  "timestamp": <unix_timestamp>
  "value": {
    "<datastream_topic>": <value>,
    ⋯
  }
}
As mentioned above, to upload data using our batch API, you need to upload a CSV-file which has a very particular format.
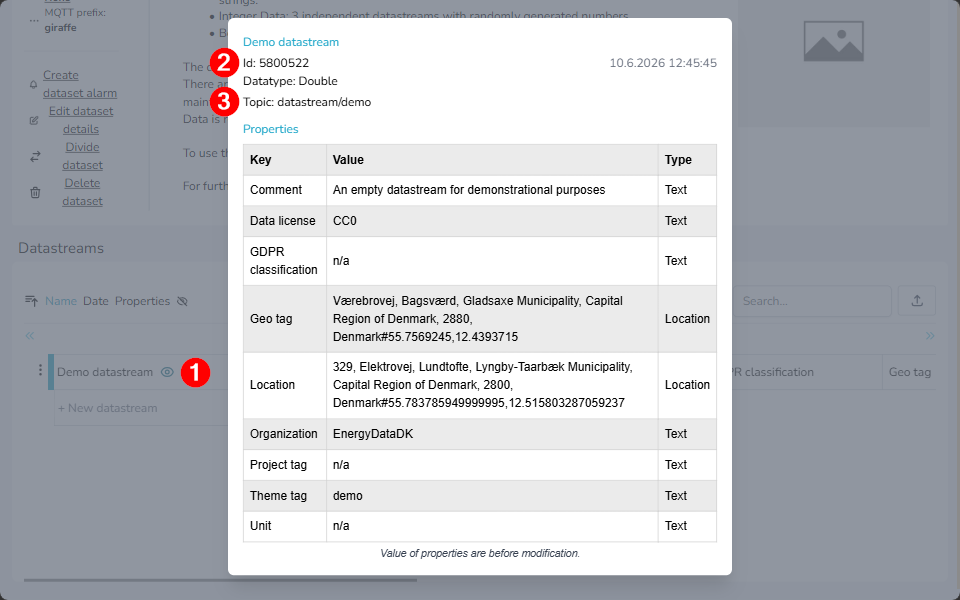
The first line starts with an empty field, followed by either a datastream ID or a (full) MQTT topic, both prefix (defined on the dataset) and suffix (defined on the datastream).
You may find this information by clicking on the icon next to the datastream name 1. A modal will be displayed with metadata, including the id 2 and topic suffix 3.
Each subsequent line must have a time stamp in the following format: yyyy-mm-ddThh:mm:ss.mmmZ, followed a by a value for each corresponding datastream.
Here is an example of how the file may look:
;100001;my/mqtt-topic;100002
1970-01-01T20:24:30.139Z;Hello world!;123.45;-10
1970-01-01T20:24:31.144Z;"another string";999888777.666;0
1970-01-01T20:24:32.161Z;Lorem ipsum dolor sit amet...;;45
1970-01-01T20:24:33.186Z;;0.001;1101
You will also need a Python script to upload the file. You may use the example below.
You will need to change the highlighted section (lines 7-11) with your own information.
					import pytz
import csv
from datetime import datetime
from EnergyDataImport import EnergyDataImport

# ###### CONFIGURATION ######
CSV_FILE_PATH = <PATH_TO_YOUR_CSV_FILE>  # Format: r"C:\Users\You\Documents\data.csv"
AUTH_TOKEN = <YOUR_API_TOKEN>            # Format: "12aBcd34e5FgH6IJklmNOpq7R8sTuvW9x0y1ZAbc"
DATASTREAM_IDS = <YOUR_DATASTREAMS_IDS>  # Format: [1, 2...]
IMPORT_NAME = <YOUR_FILE_NAME>           # Format: myFileName.csv
TMP_DIR = <YOUR_TMP_DIR>                 # Format: r"C:\Users\You\Documents\temporary"
# ###########################

# ----- NO NEED TO MODIFY ANYTHING AFTER THIS POINT -----
def run_multi_import():
    # 1. Pass the list of IDs to the properties argument
    with EnergyDataImport(
        upload_filename=IMPORT_NAME,
        properties=DATASTREAM_IDS,  # Class creates a header with all IDs
        energydata_api_token=AUTH_TOKEN,
        overwrite=True,
        tmp_dir=TMP_DIR
    ) as batch:
        with open(CSV_FILE_PATH, mode='r', encoding='utf-8') as f:
            reader = csv.reader(f, delimiter=';')
            next(reader) # Skip metadata line
            for row in reader:
                if not row or len(row) < (len(DATASTREAM_IDS) + 1):
                    continue
                # Parse timestamp (Column 0)
                raw_ts = datetime.strptime(row[0], "%Y-%m-%dT%H:%M:%S.%fZ")
                utc_ts = pytz.utc.localize(raw_ts)
                # 2. Extract values for all streams (Columns 1, 2, and 3)
                # Ensure the list length matches len(DATASTREAM_IDS)
                values = [float(row[i+1]) for i in range(len(row)-1)]
                # 3. Add the row to the batch
                batch.add_values(utc_ts, values)

        # Proceed with the standard lifecycle
        batch.upload()
        batch.validate()
        batch.ingest()

if __name__ == "__main__":
    run_multi_import()
You will also need an auxiliary file named: EnergyDataImport.py
This code contains the functions for the main fail. No modifications are required.
					import requests
import csv
import time
import os
import pytz
import json
from datetime import datetime
from enum import Enum
from typing import List
from pathlib import Path

class EnergyDataImport:
    """
    A utility class to make batch importing to EnergyData.dk easier from Python.

    This class handles building a CSV file in the correct format to be used for
    importing to EnergyData.dk via the batch API. It manages the entire lifecycle:
    creating the proper CSV, uploading, validating, and ingesting the file.
    """

    # The API host for EnergyDataDK import endpoints
    API_HOST = 'https://admin.energydata.dk/api/v1/import'
    API_HEADERS = { 'Accept' : 'application/json' }

    # The format required by EnergyDataDK for timestamps
    TIMESTAMP_FORMAT = '%Y-%m-%dT%H:%M:%S.%fZ'

    class Status(Enum):
        """Internal state machine to track the progress of the import job."""
        UNINITIALIZED = 0
        OPEN = 1
        CLOSED = 2
        UPLOADING = 3
        STORED = 4
        VALIDATING = 5
        READY = 6
        INGESTING = 7
        DONE = 8
        ABORTED = 9
        ERROR = 10

    def __init__(
        self,
        upload_filename: str,
        properties: List,
        energydata_api_token: str,
        overwrite: bool = False,
        tmp_dir: str = '/tmp/energydata_batch_upload',
        autoclean_tmp_files: bool = True):
        """
        Constructor for class. Create an instance for each batch upload.
        An instance cannot be reused between multiple imports.

        Args:
            upload_filename (str): Name for the import file generated locally and used on the server.
            properties (List): List of property IDs or Topics to which data will be added.
            energydata_api_token (str): API token from https://portal.energydata.dk/user#accesstokens.
            overwrite (bool): Controls whether to overwrite existing local or remote files.
            tmp_dir (str): Directory for temporary CSV storage before upload.
            autoclean_tmp_files (bool): If True, removes local files once the context is closed.
        """
        self.status = self.Status.UNINITIALIZED
        self.import_id = None
        self.upload_url = None
        self.added_lines = 0
        self.previous_ts = None
        self.upload_filename = upload_filename
        self.local_file_path = Path.joinpath(Path(tmp_dir), Path(upload_filename))
        self.properties = properties
        self.energydata_api_token = energydata_api_token
        self.overwrite = overwrite
        self.tmp_dir = tmp_dir
        self.autoclean_tmp_files = autoclean_tmp_files
        self.api_headers = dict(self.API_HEADERS)
        self.api_headers.update({'Authorization': f'Bearer {energydata_api_token}'})

    def __enter__(self):
        """
        Prepares the environment: creates the temp directory and opens the CSV file for writing.
        """
        self.__assert_status(self.Status.UNINITIALIZED)
        Path(self.tmp_dir).mkdir(parents=True, exist_ok=True)

        if not self.overwrite and Path.exists(self.local_file_path):
            raise Exception(f"File '{self.upload_filename}' already exists. Set overwrite=True.")

        self.fd = open(self.local_file_path, mode='w', newline='')
        # CSV format: delimiter ';', double quotes for strings, non-numeric quoting
        self.writer = csv.writer(self.fd, quoting=csv.QUOTE_NONNUMERIC, delimiter=';',
                                quotechar='"', escapechar='\\', doublequote=False)
        # Header row: First column is empty (reserved for timestamp), followed by property list
        self.writer.writerow([''] + self.properties)

        self.__change_status(self.Status.UNINITIALIZED, self.Status.OPEN)
        return self

    def __exit__(self, type, value, traceback):
        """Closes the file descriptor and handles automatic cleanup of local files."""
        if hasattr(self, 'fd') and not self.fd.closed: self.fd.close()
        if self.autoclean_tmp_files and os.path.exists(self.local_file_path):
            os.remove(self.local_file_path)
        self.status = self.Status.CLOSED

    def add_values(self, time: datetime, values: List):
        """
        Adds a row of data to the import buffer.

        Args:
            time (datetime): Timestamp. Must be timezone-aware.
            values (List): Data values matching the number of properties in the constructor.

        Raises:
            Exception: If time is not timezone-aware or if timestamps are not monotonically increasing.
        """
        self.__assert_status(self.Status.OPEN)
        if time.tzinfo == None:
            raise Exception("No timezone specified for the datetime object.")
        if len(values) != len(self.properties):
            raise Exception(f"Expected {len(self.properties)} values, found {len(values)}.")
        if self.previous_ts is not None and time <= self.previous_ts:
            raise Exception("Added timestamps must be strictly increasing.")

        self.previous_ts = time
        # Convert to UTC ISO format before writing
        self.writer.writerow(
            [time.astimezone(pytz.UTC).strftime(self.TIMESTAMP_FORMAT)] + list(values)
        )
        self.added_lines += 1

    def upload(self, print_progress = True):
        """
        Finalizes the CSV and uploads it to the server storage. Once called, state
        transitions from OPEN to UPLOADING and finally to STORED.
        """
        self.__change_status(self.Status.OPEN, self.Status.UPLOADING)
        self.fd.close()

        # 1. Create the import job record
        res = requests.post(url=self.API_HOST, headers=self.api_headers, params={'importname': self.upload_filename})
        res.raise_for_status()
        self.import_id = res.json()['id']

        # 2. Get the secure S3 upload URL
        res = requests.get(url=f'{self.API_HOST}/{self.import_id}/upload_url', headers=self.api_headers)
        res.raise_for_status()
        self.upload_url = res.json()['upload_url'].replace("\\", "")

        if print_progress: print(f'Starting file upload for job id: {self.import_id}')

        # 3. Upload the binary data
        with open(self.local_file_path, 'rb') as f:
            res = requests.put(self.upload_url, data=f, headers={"Content-Type": "application/octet-stream"})
        res.raise_for_status()

        self.__change_status(self.Status.UPLOADING, self.Status.STORED)
        if print_progress: print(f'Successfully stored job id {self.import_id}')

    def validate(self, errors_limit = 0, block = True, print_progress = True):
        """
        Triggers server-side validation. State transitions from STORED to VALIDATING
        and finally to READY.
        """
        self.__change_status(self.Status.STORED, self.Status.VALIDATING)
        self.__api_put_request(block, 'validate', lambda s: self.__validation_progress(s, print_progress), {'errors_limit': errors_limit})

    def ingest(self, block = True, print_progress = True):
        """
        Triggers final ingestion. State transitions from READY to INGESTING
        and finally to DONE.
        """
        self.__change_status(self.Status.READY, self.Status.INGESTING)
        self.__api_put_request(block, 'ingest', lambda s: self.__ingestion_progress(s, print_progress))

    def __api_put_request(self, block, path, progress_callback, body = None):
        """Helper to send PUT requests and poll for status updates."""
        res = requests.put(url=f'{self.API_HOST}/{self.import_id}/{path}', headers=self.api_headers, json=body)
        res.raise_for_status()
        while block:
            time.sleep(5)
            status = self.__get_status()
            if not progress_callback(status): break

    def __get_status(self):
        """Retrieves the current job metadata from the server."""
        res = requests.get(url=f'{self.API_HOST}/{self.import_id}', headers=self.api_headers)
        res.raise_for_status()
        return res.json()

    def __assert_status(self, expected):
        if expected != self.status:
            raise Exception(f"Expected status '{expected}', but found '{self.status}'")

    def __change_status(self, expected, to):
        self.__assert_status(expected)
        self.status = to

    def __validation_progress(self, status, print_progress):
        if print_progress: print(f'Validated {status["validated_lines"]}/{self.added_lines} lines')
        if status['status'] == 'validating': return True
        if status['status'] == 'ready':
            self.__change_status(self.Status.VALIDATING, self.Status.READY)
            return False
        raise Exception(f'Validation failed: {status["status"]}')

    def __ingestion_progress(self, status, print_progress):
        if print_progress: print(f'Ingested {status["ingested_lines"]}/{self.added_lines} lines')
        if status['status'] == 'ingesting': return True
        if status['status'] == 'done':
            self.__change_status(self.Status.INGESTING, self.Status.DONE)
            print("******Data uploaded successfully******")
            return False
        raise Exception(f'Ingestion failed: {status["status"]}')
This is by far the most complicated step, if you find the above instructions insufficient, you may find more detailed instructions in our API guide.
There are several options when it comes to sharing your data:
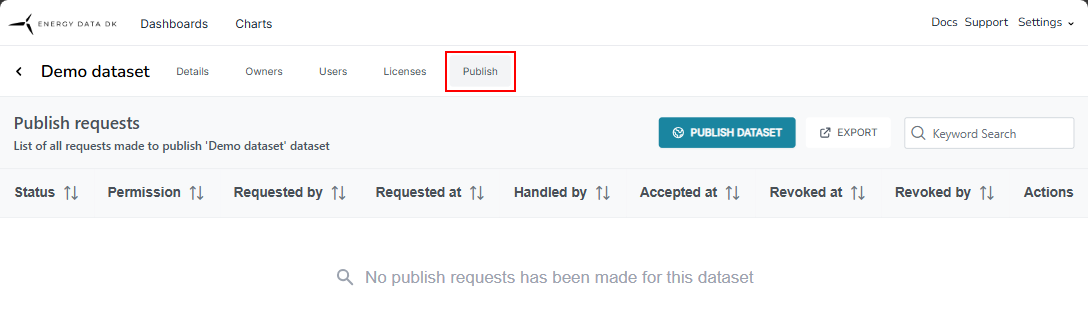
You can make a dataset available to all registered users by publishing it. To do this, view your dataset by selecting Datasets from the Settings menu, and selecting the dataset you intend to make public. Select the Publish tab and press the PUBLISH DATASET button.
You can now choose to provide "View" or "Read" access. The former allows users to see the dataset and it's metadata, but not download the data recoded within, whereas the later gives registered users acess to both the metadata and the data recorded within the datasets.
Confirm by pressing the SEND PUBLISH REQUEST button, which will send your publishing request to an administrator for review.
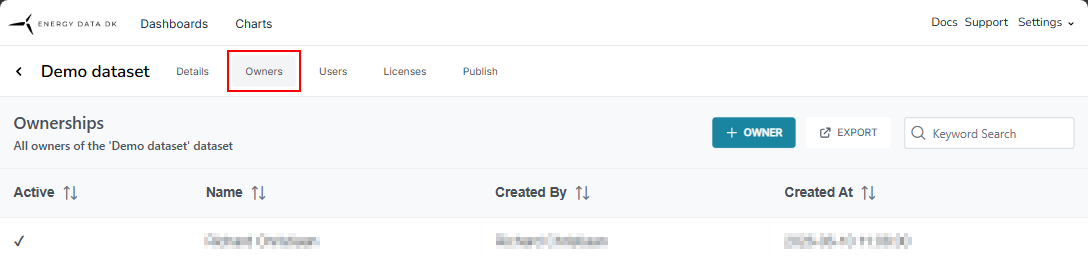
You can assign co-ownership to another EnergyDataDK user. This gives them the same access to the dataset as you have, so they can make edits and can add and access data.
To do this, view your dataset by selecting Datasets from the Settings menu, and selecting the dataset you intend to make public.
Select the Owners tab and press the OWNER button.
Enter the e-mail address of the EnergyDataDK user you want to assign co-ownership and confirm by pressing the ADD button.
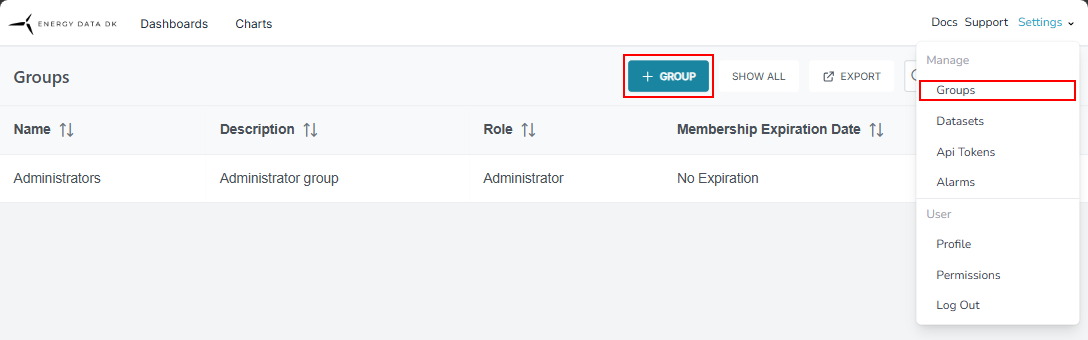
If you want to maintain control over who can access your dataset, and what they are allowed to do you can create groups which are assigned licenses which define the privileges the users which are added to any particular group has.
The easiest and most logical approach is to start by creating a group first, create the license that defines its corresponding privileges, and add users to it last. You can also add or remove users at any point in the future, so you can create groups and licenses for relevant use cases, even if you don’t have any users to add right now.
Users are granted privileges through their membership to a group, which can have licenses assigned to them which grant these privileges.
So if you don’t have any already, you’ll need to create a new group.
To do this, select Groups from the Settings menu.
Press the GROUP button.
Enter a name and a description that makes it easy to understand who the group is for, and what privileges membership to it grants, and confirm by pressing the CREATE button.
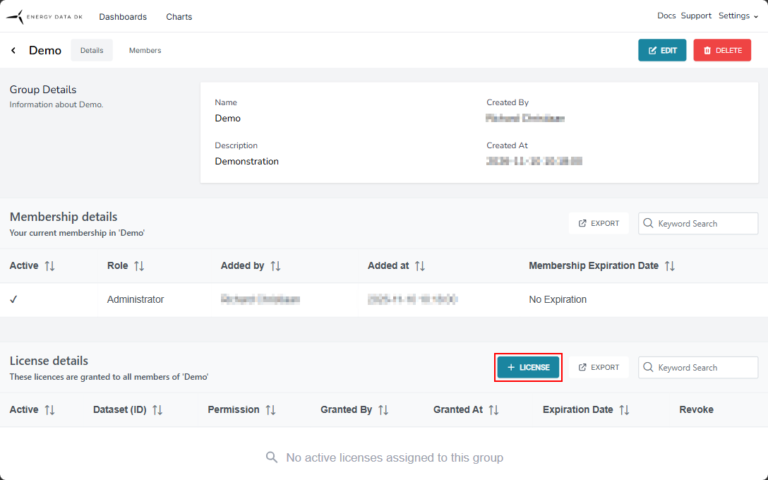
When you create a group, it’s not tied to any group just yet. This is done by assigning licenses to the group.
If you followed the previous step, you’ll already be where you need to be to start creating a license. If you skipped the previous step you’ll need to select Groups from the Settings menu, and selecting a previously created group from the overview.
Start the license creation process by pressing the LICENSE button.
Under Terms you can write a short description that makes it clear what the license is for. Select whether the license should grant reading or writing privileges by selecting "Read" or "Write" in the Permission field.
You can set an expiration date in the Expiration Date field. This is very useful if access is only intended to be granted temporarily, for example for the duration of a project or a course.
Select the dataset you want to tie the group to and finalize the creation process by pressing the Create button.
When you have a group with a license, you can start adding members to it.
Open the Group view by selecting Groups from the Settings menu and select the Members tab.
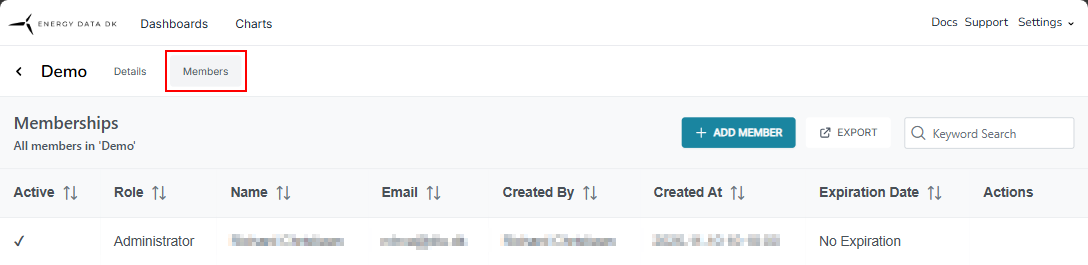
Start adding a group member by pressing the ADD MEMBER button.
Enter the username for the person you want to add as a group member in the Email field. Leave the Role as "Member" (unless you want this user to temporarily have administrative privileges).
You can let the membership automatically expire by setting an expiration date in the Expiration Date field
Finalize adding the new group member by pressing the ADD button, and repeat the above step for any additional group members.