| Term | Meaning |
|---|---|
| API (Application Programming Interface) |
A set of rules that allows different software systems to communicate and exchange data with each other. |
| MQTT (Message Queuing Telemetry Transport) |
Lightweight messaging protocol used to transmit data between devices through a central server called a broker. It follows a publish/subscribe model: devices publish data to specific topics, and other devices subscribe to those topics to receive the messages. |
| MQTT Prefix | A single alphanumeric string configured by data owner. This prefix is placed at the beginning of all MQTT topics associated with specific data set. It acts as a simple identifier that groups topics together and distinguishes them from those of other data sets. |
| MQTT Sufix (Topic) | A unique label for a datastream. The suffix is added after the MQTT prefix and forms the full topic used when publishing or requesting data for that datastream. |
| Token | A token is a unique string used to authenticate and authorize access to an API or data service. It identifies the requester and ensures that only permitted systems or users can insert or retrieve data. |
| Deploy Token | A deploy token is a credential that is explicitly permitted to perform certain operations on specific datasets. It is intended for use when deploying devices or other systems in the field. Because a deploy token has only limited, predefined permissions, any compromise of the device or system using it results in minimal exposure. You can link any of the licenses you have via group memberships to the token. |
| Personal Access Token | A personal access token is a credential that carries the same rights as the user account that issued it. It is intended for use on the issuing user’s own computer for local development and testing.
Warning: If compromised, a personal access token can be used to access everything available to the issuing user. |
Which takes you to page shown below.
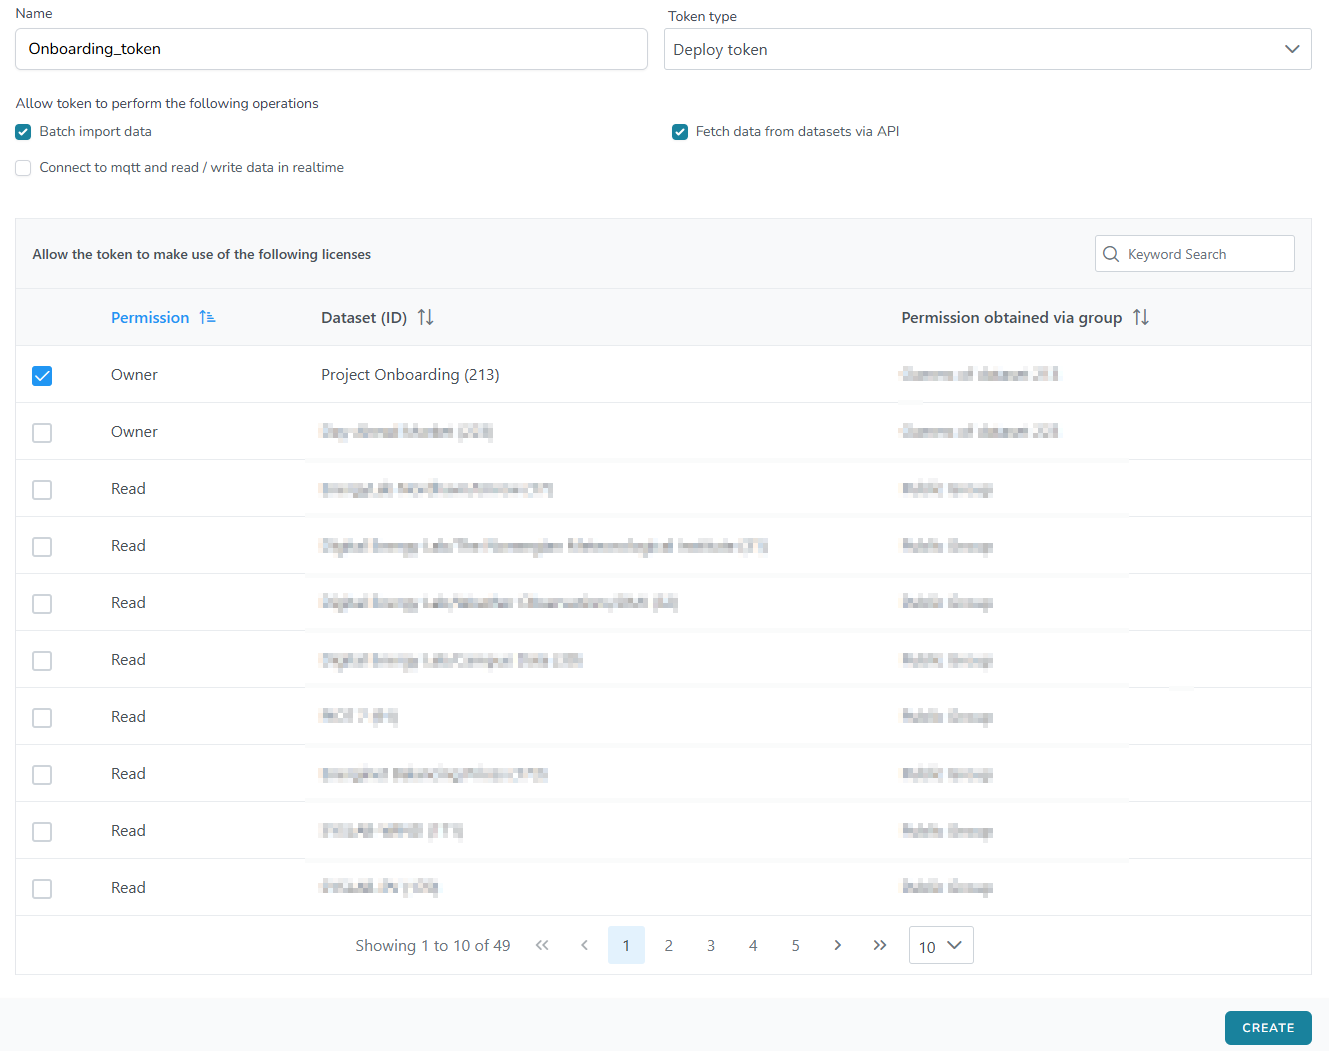
To create a new token, enter a name in the field at the top, select the token type, and then choose the token permissions. Two token types are available: “Deploy token” and “Personal access token”. Their definitions are provided in the Terminology section of this guide.
Token permissions
The permissions you can grant to a specific token are the following, being possible to select more than one:
To select which dataset you want to grant the token access to, you can use the search box in the bottom right corner of the Figure 2.
Once everything is set, you can create the token by clicking “Create” at the bottom of the page. A pop up will show up, in which the API token will be shown. It is important to note that the token is only shown once, and there is no other way to access it.
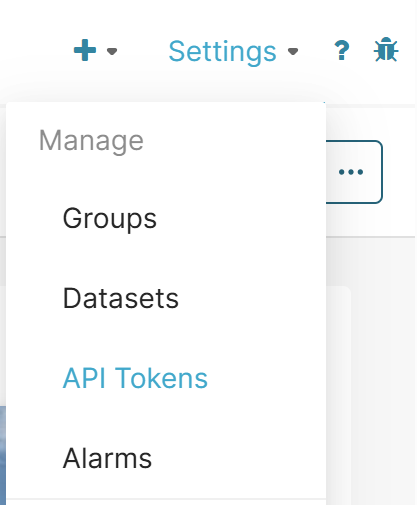
Manage API tokens
Token management is available on the same page used to create new tokens.
At the bottom of the page, you’ll find a list of all tokens you have created (Fig. 3).

From this list, you can view token details or delete tokens, but the token value is not visible once created.
The file must be formatted as CSV according to RFC4180. Additionally, if the file contains non-ascii characters, the file should be encoded as UTF-8.
The first row of the CSV file must contain headers. The header of a given column identifies the datastream to which the column’s data must be imported. The header can either be the MQTT topic associated with the given datastream, for example: “prefix/suffix”, or the datastream ID, for example: “123456”.
The first column of the first row is ignored.
As a data owner, you assign topics to datastreams during the Dataset Creation process. However, if ownership of a dataset has been granted by another user or you do not have ownership right and the topics are unknown to you, the topic and datastream ID can be found in several ways. The ways to retrieve them are explained in section Topic and Datastream ID Retrieval.
YYYY-MM-DD[T]HH:mm:ss.SSS[Z], e.g. 2021-05-01T10:12:44.432Z for May 1st 2023, 10:12:44.432 UTC. Below is an example file. Note that the first datastream (117217) is of type string, the second datastream (my/topic) is of type double and the last datastream (119221) is of type integer.
;117217;my/topic;119221
2021-03-10T20:24:30.139Z;a_string;23.4121;-10
2021-03-10T20:24:31.144Z;"another string";999888777.121;0
2021-03-10T20:24:32.161Z;a third string;-1.33e-16;45
2021-03-10T20:24:33.186Z;;54.1;11
2021-03-10T20:24:34.201Z;a-fourth-string;;45
Note the empty fields in row 5 (datastream 117217) and row 6 (my/topic). For datastream 117217, an empty string will be imported with timestamp 2021-03-10T20:24:33.186Z. For datastream my/topic, no value will be imported with timestamp 2021-03-10T20:24:34.201Z.
EnergyDataDK’s API URL is: https://admin.energydata.dk/api/v1/import
You can do this from your personal computer’s terminal (command prompt), and the words inside “<>” are to be filled with your information.< and > brackets.
Example:
ssh <username>@<ip_address>ssh admin@123.45.67.89 (Not ssh <admin>@<123.45.67.89>)Start your command line terminal.
In Windows you can do this by pressing + R, entering the command “cmd”, and pressing your “Enter” key.
To get started, enter the following command:
curl -H "Authorization: Bearer <your_token>" -H "Accept: application/json" -X POST https://admin.energydata.dk/api/v1/import --data-urlencode "importname=<import_name>"
The system will return an object with information about the upload:
{
  "user_id":<your_user_id>,
  "status":"stored",
  "name":"import_name",
  "updated_at":"2025-09-17T08:15:43.000000Z",
  "created_at":"2025-09-17T08:15:43.000000Z",
  "id":00000
}
We will need the id to continue with the next step; getting the upload URL.
Using the id obtained from the output of the previous command, enter the following command:
curl -H "Authorization: Bearer <your_token>" -H "Accept: application/json" "https://admin.energydata.dk/api/v1/import/<id>/upload_url"
The system will return your unique link, which will look similar to this:
{"upload_url":"https:\/\/s3.energydata.dk\/import\/inbox\/s123456\/a53f2b5d-0493-44ea-bed7-e48c26cf99ed.csv?X-Amz-Content-Sha256=UNSIGNED-PAYLOAD&X-Amz-Algorithm=AWS4-HMAC-SHA256&X-Amz-Credential=edk-s3-root%2F20250917%2Fdefault%2Fs3%2Faws4_request&X-Amz-Date=20250917T082537Z&X-Amz-SignedHeaders=host&X-Amz-Expires=7200&X-Amz-Signature=29744bc062fe06d545250c56b2cc8e19cdf4095b9fd936392fdb7f92ab88f1bc"} curl -H PUT -T "<path_to_file>" -H "Content-Type: application/octet-stream" "<upload_url>"
The system won’t return anything, but the upload must still be validated and ingested.
To validate the import, enter the following command:
curl -H "Authorization: Bearer <your_token>" -H "Accept: application/json" -X PUT https://admin.energydata.dk/api/v1/import/<id>/validate
The system should return something similar to this:
{
  "id":00000,
  "name":"import_name",
  status":"validating",
  "user_id":000,
  "datastreams":null,
  "validated_lines":0,
  "ingested_lines":0,
  "min_ts":null,
  "max_ts":null,
  "validated_at":null,
  "ingested_at":null,
  "created_at":"2026-04-08T11:06:52.000000Z",
  "updated_at":"2026-04-08T11:35:05.000000Z"
} The last step is ingesting the upload. To do this, enter the following command:
curl -H "Authorization: Bearer <your_token>" -H "Accept: application/json" -X PUT https://admin.energydata.dk/api/v1/import/<id>/ingest
{
  "id":00000,
  "name":"Import_name",
  "status":"ingesting",
  "user_id":000,
  "datastreams":[1000001,1000002,1000003],
  "validated_lines":100,
  "ingested_lines":0,
  "min_ts":"2026-01-01T00:00:00.000000Z",
  "max_ts":"2026-03-22T00:00:00.000000Z",
  "validated_at":"2026-04-08T12:11:08.000000Z",
  "ingested_at":null,
  "created_at":"2026-04-08T12:09:50.000000Z",
  "updated_at":"2026-04-08T12:13:21.000000Z"
}
The “status” should be “ingesting”. If there’s something wrong with your CSV file, you’ll get the following error instead:
{"error":"Unable to start ingestion"} Here is an example code written in Python to batch upload data. When downloading, it is necessary to change the file from .txt to .py, or simply copy and past to your preferred code editor. If you proceed with the latter, it must be divided into two files, with the same names as the downloaded files.
Main file: batch_upload.py
This is the code required to run to upload your csv file to EnergyDataDK. You will need to provide your API token and the datastream IDs corresponding to the datastreams to which you want to upload your data.
It is not necessary to modify anything else in the code besides the following 3 custom values.
<PATH_TO_YOUR_CSV_FILE>: In Python you can use “/”, “\\”, or “\”. However, because \U, \D, etc. are treated as escape sequences, we recommend using either “/”, or “\\”, or adding “r” in front of the URL to indicate this is a raw string.
For example:
<YOUR_API_TOKEN>: This is your API token, it should look similar to this: "12aBcd34e5FgH6IJklmNOpq7R8sTuvW9x0y1ZAbc".<YOUR_DATASTREAM_IDS>: If intend to upload a single datastream, you can enter the single value between square brackets and quotation marks, like this: ["1000001"]. If you wish to upload several datastreams at once, you separate the values with commas, like this: ["1000001", "1000002", "1000003"].
					import pytz
import csv
from datetime import datetime
from EnergyDataImport import EnergyDataImport

# ###### CONFIGURATION ######
CSV_FILE_PATH = <PATH_TO_YOUR_CSV_FILE>  # Format: r"C:\Users\You\Documents\data.csv"
AUTH_TOKEN = <YOUR_API_TOKEN>            # Format: "12aBcd34e5FgH6IJklmNOpq7R8sTuvW9x0y1ZAbc"
DATASTREAM_IDS = <YOUR_DATASTREAMS_IDS>  # Format: ["datastream_ID1", "datastream_ID2"...]
IMPORT_NAME = "default.csv"
# ###########################

# ----- NO NEED TO MODIFY ANYTHING AFTER THIS POINT -----
def run_multi_import():
    # 1. Pass the list of IDs to the properties argument
    with EnergyDataImport(
        upload_filename=IMPORT_NAME,
        properties=DATASTREAM_IDS,  # Class creates a header with all IDs
        energydata_api_token=AUTH_TOKEN,
        overwrite=True
    ) as batch:
        with open(CSV_FILE_PATH, mode='r', encoding='utf-8') as f:
            reader = csv.reader(f, delimiter=';')
            next(reader) # Skip metadata line
            for row in reader:
                if not row or len(row) < (len(DATASTREAM_IDS) + 1):
                    continue
                # Parse timestamp (Column 0)
                raw_ts = datetime.strptime(row[0], "%Y-%m-%dT%H:%M:%S.%fZ")
                utc_ts = pytz.utc.localize(raw_ts)
                # 2. Extract values for all streams (Columns 1, 2, and 3)
                # Ensure the list length matches len(DATASTREAM_IDS)
                values = [float(row[i+1]) for i in range(len(row)-1)]
                # 3. Add the row to the batch
                batch.add_values(utc_ts, values)

        # Proceed with the standard lifecycle
        batch.upload()
        batch.validate()
        batch.ingest()

if __name__ == "__main__":
    run_multi_import()
Auxiliary file: EnergyDataImport.py
This code is contains the functions for the main fail. No modifications are required.
					import requests
import csv
import time
import os
import pytz
import json
from datetime import datetime
from enum import Enum
from typing import List
from pathlib import Path

class EnergyDataImport:
    """
    A utility class to make batch importing to EnergyData.dk easier from Python.

    This class handles building a CSV file in the correct format to be used for
    importing to EnergyData.dk via the batch API. It manages the entire lifecycle:
    creating the proper CSV, uploading, validating, and ingesting the file.
    """

    # The API host for EnergyDataDK import endpoints
    API_HOST = 'https://admin.energydata.dk/api/v1/import'
    API_HEADERS = { 'Accept' : 'application/json' }

    # The format required by EnergyDataDK for timestamps
    TIMESTAMP_FORMAT = '%Y-%m-%dT%H:%M:%S.%fZ'

    class Status(Enum):
        """Internal state machine to track the progress of the import job."""
        UNINITIALIZED = 0
        OPEN = 1
        CLOSED = 2
        UPLOADING = 3
        STORED = 4
        VALIDATING = 5
        READY = 6
        INGESTING = 7
        DONE = 8
        ABORTED = 9
        ERROR = 10

    def __init__(
        self,
        upload_filename: str,
        properties: List,
        energydata_api_token: str,
        overwrite: bool = False,
        tmp_dir: str = '/tmp/energydata_batch_upload',
        autoclean_tmp_files: bool = True):
        """
        Constructor for class. Create an instance for each batch upload.
        An instance cannot be reused between multiple imports.

        Args:
            upload_filename (str): Name for the import file generated locally and used on the server.
            properties (List): List of property IDs or Topics to which data will be added.
            energydata_api_token (str): API token from https://portal.energydata.dk/user#accesstokens.
            overwrite (bool): Controls whether to overwrite existing local or remote files.
            tmp_dir (str): Directory for temporary CSV storage before upload.
            autoclean_tmp_files (bool): If True, removes local files once the context is closed.
        """
        self.status = self.Status.UNINITIALIZED
        self.import_id = None
        self.upload_url = None
        self.added_lines = 0
        self.previous_ts = None
        self.upload_filename = upload_filename
        self.local_file_path = Path.joinpath(Path(tmp_dir), Path(upload_filename))
        self.properties = properties
        self.energydata_api_token = energydata_api_token
        self.overwrite = overwrite
        self.tmp_dir = tmp_dir
        self.autoclean_tmp_files = autoclean_tmp_files
        self.api_headers = dict(self.API_HEADERS)
        self.api_headers.update({'Authorization': f'Bearer {energydata_api_token}'})

    def __enter__(self):
        """
        Prepares the environment: creates the temp directory and opens the CSV file for writing.
        """
        self.__assert_status(self.Status.UNINITIALIZED)
        Path(self.tmp_dir).mkdir(parents=True, exist_ok=True)

        if not self.overwrite and Path.exists(self.local_file_path):
            raise Exception(f"File '{self.upload_filename}' already exists. Set overwrite=True.")

        self.fd = open(self.local_file_path, mode='w', newline='')
        # CSV format: delimiter ';', double quotes for strings, non-numeric quoting
        self.writer = csv.writer(self.fd, quoting=csv.QUOTE_NONNUMERIC, delimiter=';',
                                quotechar='"', escapechar='\\', doublequote=False)
        # Header row: First column is empty (reserved for timestamp), followed by property list
        self.writer.writerow([''] + self.properties)

        self.__change_status(self.Status.UNINITIALIZED, self.Status.OPEN)
        return self

    def __exit__(self, type, value, traceback):
        """Closes the file descriptor and handles automatic cleanup of local files."""
        if hasattr(self, 'fd') and not self.fd.closed: self.fd.close()
        if self.autoclean_tmp_files and os.path.exists(self.local_file_path):
            os.remove(self.local_file_path)
        self.status = self.Status.CLOSED

    def add_values(self, time: datetime, values: List):
        """
        Adds a row of data to the import buffer.

        Args:
            time (datetime): Timestamp. Must be timezone-aware.
            values (List): Data values matching the number of properties in the constructor.

        Raises:
            Exception: If time is not timezone-aware or if timestamps are not monotonically increasing.
        """
        self.__assert_status(self.Status.OPEN)
        if time.tzinfo == None:
            raise Exception("No timezone specified for the datetime object.")
        if len(values) != len(self.properties):
            raise Exception(f"Expected {len(self.properties)} values, found {len(values)}.")
        if self.previous_ts is not None and time <= self.previous_ts:
            raise Exception("Added timestamps must be strictly increasing.")

        self.previous_ts = time
        # Convert to UTC ISO format before writing
        self.writer.writerow(
            [time.astimezone(pytz.UTC).strftime(self.TIMESTAMP_FORMAT)] + list(values)
        )
        self.added_lines += 1

    def upload(self, print_progress = True):
        """
        Finalizes the CSV and uploads it to the server storage. Once called, state
        transitions from OPEN to UPLOADING and finally to STORED.
        """
        self.__change_status(self.Status.OPEN, self.Status.UPLOADING)
        self.fd.close()

        # 1. Create the import job record
        res = requests.post(url=self.API_HOST, headers=self.api_headers, params={'importname': self.upload_filename})
        res.raise_for_status()
        self.import_id = res.json()['id']

        # 2. Get the secure S3 upload URL
        res = requests.get(url=f'{self.API_HOST}/{self.import_id}/upload_url', headers=self.api_headers)
        res.raise_for_status()
        self.upload_url = res.json()['upload_url'].replace("\\", "")

        if print_progress: print(f'Starting file upload for job id: {self.import_id}')

        # 3. Upload the binary data
        with open(self.local_file_path, 'rb') as f:
            res = requests.put(self.upload_url, data=f, headers={"Content-Type": "application/octet-stream"})
        res.raise_for_status()

        self.__change_status(self.Status.UPLOADING, self.Status.STORED)
        if print_progress: print(f'Successfully stored job id {self.import_id}')

    def validate(self, errors_limit = 0, block = True, print_progress = True):
        """
        Triggers server-side validation. State transitions from STORED to VALIDATING
        and finally to READY.
        """
        self.__change_status(self.Status.STORED, self.Status.VALIDATING)
        self.__api_put_request(block, 'validate', lambda s: self.__validation_progress(s, print_progress), {'errors_limit': errors_limit})

    def ingest(self, block = True, print_progress = True):
        """
        Triggers final ingestion. State transitions from READY to INGESTING
        and finally to DONE.
        """
        self.__change_status(self.Status.READY, self.Status.INGESTING)
        self.__api_put_request(block, 'ingest', lambda s: self.__ingestion_progress(s, print_progress))

    def __api_put_request(self, block, path, progress_callback, body = None):
        """Helper to send PUT requests and poll for status updates."""
        res = requests.put(url=f'{self.API_HOST}/{self.import_id}/{path}', headers=self.api_headers, json=body)
        res.raise_for_status()
        while block:
            time.sleep(5)
            status = self.__get_status()
            if not progress_callback(status): break

    def __get_status(self):
        """Retrieves the current job metadata from the server."""
        res = requests.get(url=f'{self.API_HOST}/{self.import_id}', headers=self.api_headers)
        res.raise_for_status()
        return res.json()

    def __assert_status(self, expected):
        if expected != self.status:
            raise Exception(f"Expected status '{expected}', but found '{self.status}'")

    def __change_status(self, expected, to):
        self.__assert_status(expected)
        self.status = to

    def __validation_progress(self, status, print_progress):
        if print_progress: print(f'Validated {status["validated_lines"]}/{self.added_lines} lines')
        if status['status'] == 'validating': return True
        if status['status'] == 'ready':
            self.__change_status(self.Status.VALIDATING, self.Status.READY)
            return False
        raise Exception(f'Validation failed: {status["status"]}')

    def __ingestion_progress(self, status, print_progress):
        if print_progress: print(f'Ingested {status["ingested_lines"]}/{self.added_lines} lines')
        if status['status'] == 'ingesting': return True
        if status['status'] == 'done':
            self.__change_status(self.Status.INGESTING, self.Status.DONE)
            print("******Data uploaded successfully******")
            return False
        raise Exception(f'Ingestion failed: {status["status"]}')
python -m pip install pytz.
This will install the missing module.
You can use the fetch data API to download data from one or more datastreams from a dataset. Please note that you need “read” rights to fetch the data. The resource can be used to retrieve either the latest values, or values which correspond to a timespan.
Please note that this resource does not return JSON for successful requests. In these cases, response data is streamed back to the client as CSV. But you should still specify Accept: application/json in the header to ensure errors are returned to the client as JSON.
To fetch data, you have to use the following URL: https://admin.energydata.dk/api/v1/datastreams/values, with some API parameters, which are:
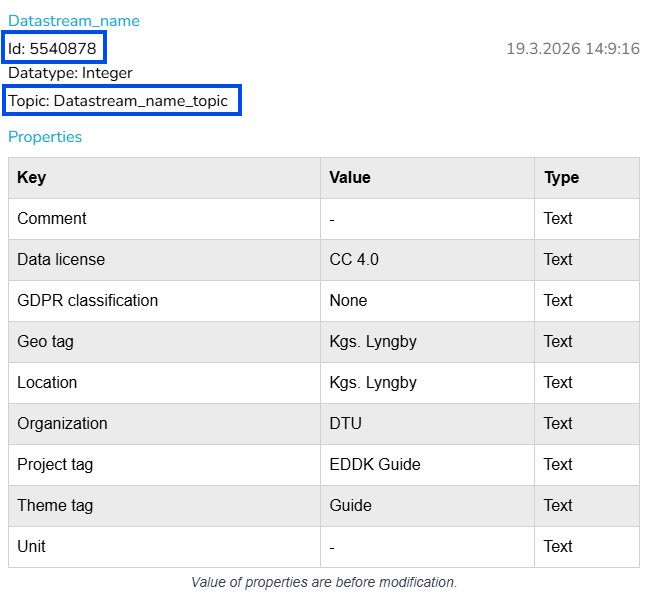
To obtain the datastream ids, if you are the owner, you can see these at the respective dataset page, clicking in the datastream you are interested in (reference same picture as in the bath upload). If you only have “Write” rights, you can only see these by yourself by downloading from the website a fraction of the data, even if it is empty. From such file, the headers contain the desired ids and topics.
< and > brackets.
Example:
ssh <username>@<ip_address>ssh admin@123.45.67.89 (Not ssh <admin>@<123.45.67.89>)curl -X GET "https://admin.energydata.dk/api/v1/datastreams/values?ids=<list_of_datastreams>&from=<start_of_timespan>&to=<end_of_timespan>" -H "Accept: application/json" -H "Authorization: Bearer <your_token>" -o "<output_file.csv>"
The output will look something similar to this, but with the specific data from your import. The output CSV-file will be stored in the same directory from which you issued the command.
  % Total    % Received % Xferd  Average Speed   Time    Time     Time  Current
                                 Dload  Upload   Total   Spent    Left  Speed
100 46 0 46 0 0 271 0 --:--:-- --:--:-- --:--:-- 277 This method returns the latest row (or timestamp) of the available data for the specified datastream or datastreams. No need to specify “from” or “to”, only the datastream ids.
curl -X GET "https://admin.energydata.dk/api/v1/datastreams/values?ids=<list_of_datastreams>&latest=True" -H "Accept: application/json" -H "Authorization: Bearer <your_token>" -o "<output_file.csv>"
The output will look something similar to this, but with the specific data from your import. The output CSV-file will be stored in the same directory from which you issued the command.
  % Total    % Received % Xferd  Average Speed   Time    Time     Time  Current
                                 Dload  Upload   Total   Spent    Left  Speed
100 32 0 32 0 0 218 0 --:--:-- --:--:-- --:--:-- 225 The MQTT API allows you to upload (publish) data to one or more datastreams or download (subscribe to) one or more datastreams in real time. Multiple values can be published simultaneously, and MQTT‘s Quality of Service (QoS) is supported. To use the MQTT API, you must have “write” rights to the dataset or be its owner.
The API is built on top of the MQTT protocol, version 3.1.1. The broker is available at mqtts.energydata.dk and is open for MQTT connections on port 8883.
Here is a breakdown of the QoS levels:
Publishing data allows data providers to send data to be stored in EnergyDataDK. It’s possible to publish single-value and multi-value messages.
Single-value messages contain a timestamp and a value. The datastream associated with the message is inferred from the MQTT topic. The timestamp must be an integer in Unix Epoch format, that is, the number of milliseconds since 01-01-1970. The value type depends on what is specified on that specific datastream, string, double or integer.
					{
  "timestamp": <unix_timestamp>,
  "value": <value>
}
For example:
					{
  "timestamp": 1775727761141,
  "value": 14.47
}
Multi-value messages are used in situations where you need to publish several different but related values. They will be added with the same timestamp to the same dataset, on datastream topics specified as follows:
					{
  "timestamp": <unix_timestamp>
  "value": {
    "<datastream_topic>": <value>,
    ⋯
  }
}
For example:
					{
  "timestamp": 1775727761141
  "value": {
    "a-datastream-topic": 14.47,
    "other-datastream-topic": 34,
    "last-datastream-topic": "Hello world",
  }
}
An example Python code for publishing single-value messages can be found below, where placeholders (the words inside “<>”) must be replaced with your information.
There are 4 pieces of information for you to customize:
| Variable | Format |
|---|---|
| CLIENT_ID | Unique identifier without spaces. For example:
|
| TOPIC | In single-value messages the full MQTT topic is required, meaning both the dataset topic and the datastream topic. For example:
|
| TOKEN | Your API token, which grants write access to the dataset in question. For example:
|
| VALUE | The value that is to be entered in the datastream. For example:
|
The timestamp will be added automatically and will be the time you run this script.
					import paho.mqtt.client as mqtt
import time
import json

# MQTT Configuration
BROKER = "mqtts.energydata.dk"
PORT = 8883
KEEPALIVE = 45
CLIENT_ID = <MY_UNIQUE_MQTT_CLIENT_ID>
TOPIC = <MQTT_TOPIC>
TOKEN = <API_TOKEN>
VALUE = <VALUE>

# Connection tracking flag
connected = False

# Callback when connected
def on_connect(client, userdata, flags, rc):
    global connected
    if rc == 0:
        print("Connected to broker.")
        connected = True
    else:
        print(f"Connection failed with code {rc}.")

# Callback when disconnected
def on_disconnect(client, userdata, rc):
    global connected
    print("Disconnected.")
    connected = False

# Create client
client = mqtt.Client(client_id=CLIENT_ID)
client.username_pw_set(username=TOKEN)
client.tls_set()

# Attach callbacks
client.on_connect = on_connect
client.on_disconnect = on_disconnect

# Connect to the broker
client.connect(host=BROKER, port=PORT, keepalive=KEEPALIVE)

# Start background loop
client.loop_start()

# Wait for connection
message_printed = False
while not connected:
    if not message_printed:
        print("Waiting for connection...")
        message_printed = True
    time.sleep(.5)

try:
    timestamp = int(time.time() * 1000)
    payload = {
        "timestamp": timestamp,
        "value": VALUE
    }

    # Publish the message
    result = client.publish(topic=TOPIC, qos=0, payload=json.dumps(payload))

    # Check the result
    if result[0] == 0:
        print(f"Message published successfully.")
    else:
        print(f"Failed to publish message, result code: {result[0]}.")

except KeyboardInterrupt:
    print("Stopping publisher...")
except Exception as e:
    print(f"Exception: {e}")
finally:
    client.loop_stop()
    client.disconnect()
An example Python code for publishing multi value messages can be found below, where placeholders (the words inside “<>”) must be replaced with your information.
| Variable | Format |
|---|---|
| CLIENT_ID | Unique identifier without spaces. For example:
|
| TOPIC | In multi-value messages the dataset topic is required, the datastream topics will be defined in the payload. For example:
|
| TOKEN | Your API token, which grants write access to the dataset in question. For example:
|
| payload | The payload containing the timestamp and the values to be entered into the datastreams. Please note that the timestamp in this example is a calculated value. For example: {
"timestamp": timestamp,
"value": {
"b325/electricity-consumption": 34.5678,
"b329/electricity-consumption": 234.567,
"b329a/electricity-consumption": 2.34567
}
}
|
					import paho.mqtt.client as mqtt
import time
import json

# MQTT Configuration
BROKER = "mqtts.energydata.dk"
PORT = 8883
KEEPALIVE = 45
CLIENT_ID = <MY_UNIQUE_MQTT_CLIENT_ID>
TOPIC = <DATASET_TOPIC>
TOKEN = <API_TOKEN>

# Connection tracking flag
connected = False

# Callback when connected
def on_connect(client, userdata, flags, rc):
    global connected
    if rc == 0:
        print("Connected to broker.")
        connected = True
    else:
        print(f"Connection failed with code {rc}.")

# Callback when disconnected
def on_disconnect(client, userdata, rc):
    global connected
    print("Disconnected.")
    connected = False

# Create client
client = mqtt.Client(client_id=CLIENT_ID)
client.username_pw_set(username=TOKEN)
client.tls_set()

# Attach callbacks
client.on_connect = on_connect
client.on_disconnect = on_disconnect

# Connect to the broker
client.connect(host=BROKER, port=PORT, keepalive=KEEPALIVE)

# Start background loop
client.loop_start()

# Wait for connection
message_printed = False
while not connected:
    if not message_printed:
        print("Waiting for connection...")
        message_printed = True
    time.sleep(.5)

try:
    timestamp = int(time.time() * 1000)
    payload = {
        "timestamp": timestamp,
        "value": {
            <DATASTREAM_TOPIC>: <VALUE>
        }
    }

    # Publish the message
    result = client.publish(topic=TOPIC, qos=0, payload=json.dumps(payload))

    # Check the result
    if result[0] == 0:
        print(f"Message published successfully.")
    else:
        print(f"Failed to publish message, result code: {result[0]}.")

except KeyboardInterrupt:
    print("Stopping publisher...")
except Exception as e:
    print(f"Exception: {e}")
finally:
    client.loop_stop()
    client.disconnect()
python -m pip install paho-mqtt.
This will install the missing module.
When publishing to EnergyDataDK using MQTT you should use Quality of Service (QoS) 1 to ensure that messages are delivered. This is especially important if you publish with a high throughput, as overload protection mechanisms can discard your messages. Why and how is described in detail below.
When the EnergydataDK MQTT broker receives a publish message from your client, the message is added to a queue of incoming messages. This queue is per-client, and can contain up to 1000 messages. Messages in the queue are dequeued serially in a FIFO manner. When dequeued, the MQTT broker checks that the client is authorized for publishing messages on the given topic.
If authorization succeeds, the message is forwarded for storage in EnergyDataDK, and to any clients subscribed to the given topic. If the message was published with QoS 1 or 2, the MQTT broker sends the acknowledgement after authorization succeeds.
If authorization does not succeed, the client is immediately disconnected and any messages in the incoming message queue are discarded.
If the MQTT broker is not able to keep up with the client, the incoming message queue will eventually be full. When the queue is full, the MQTT broker discards any messages it receives from the client.
This means your client must throttle itself to avoid losing messages. You do this by publishing your messages with QoS 1. Your client must then wait to receive an acknowledgement from the broker before publishing more messages. This can be done in Python with the paho-mqtt <https://pypi.python.org/pypi/pahomqtt/> library with the function wait_for_publish.
It allows subscribers to receive real-time messages with the data published to EnergyDataDK. An example Python code on how to subscribe to a specific datastream to retrieve its live data is shown below, where again where the words inside “<>” are to be filled with your information.
					import paho.mqtt.client as mqtt
from datetime import datetime, timezone

# MQTT Configuration
broker_host = 'mqtts.energydata.dk'
broker_port = 8883
subscribe_topic = "<mqtt_prefix/datastream_topic>"
token = "<your_token>"

# Callback when the client connects to the broker
def on_connect(client, userdata, flags, rc):
    if rc == 0:
        print(f"Connected to {broker_host} successfully!")
        client.subscribe(subscribe_topic, qos=1)
        print(f"Subscribed to topic: {subscribe_topic}")
    else:
        print(f"Connection failed with code {rc}")

# Callback when a message is received
def on_message(client, userdata, msg):
    payload = msg.payload.decode()
    print(f"[{datetime.now(timezone.utc)}] Received `{payload}` from `{msg.topic}`")

# Create and configure the MQTT client
client = mqtt.Client()
client.username_pw_set(token)
client.tls_set()
client.on_connect = on_connect
client.on_message = on_message
python -m pip install paho-mqtt.
This will install the missing module.
The MQTT prefix is the one corresponding to the dataset, why the datastream topic is for the specific datastream.
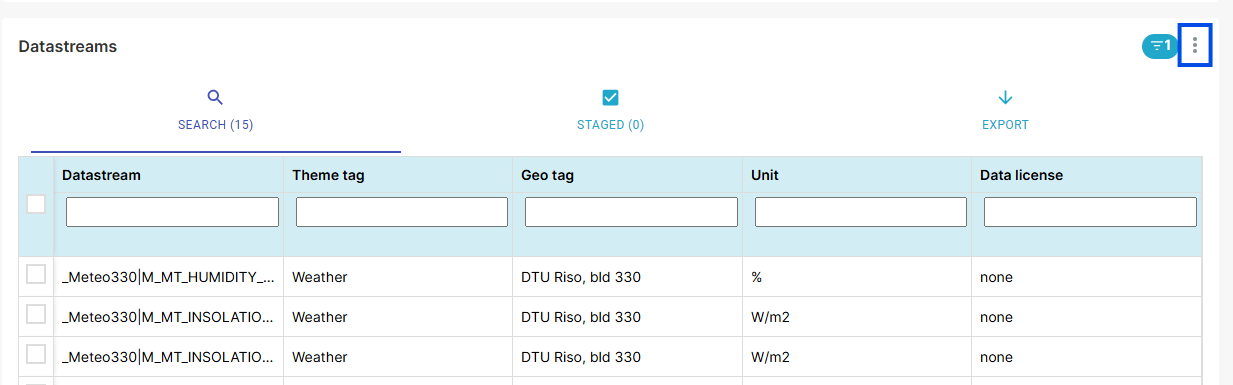
Another option is to download the complete metadata for the selected dataset by clicking the download icon located in the top-right corner of the Datastream page (Fig. 5). This download includes metadata for all datastreams, along with their corresponding names and IDs.